Introduction
Before reading this article, ensure you are familiar with the Complete Guide to Concrete Structures Design to Standard Australia’s AS 3600, including:
- Design of Rectangular Reinforced Concrete Beam
- Design of Reinforced Concrete Column
- Reinforced Concrete Slab Design
- Development Length of Reinforced Bars
Once an engineer is familiar with these design processes and principles, the final step in the design of concrete structures is understanding the detailing requirements of reinforced concrete.
Detailing helps join all these designs together and ensures that concrete connections and construction joints are built according to AS 3600. Proficient detailers are usually very experienced structural designers, as the requirements in AS 3600 are less prescriptive and methodical compared to the design of bespoke structural elements.
The importance of reinforced concrete detailing
Detailing is commonly understood as the process of creating detailed drawings that specify the size and placement of reinforcement within a concrete structure.
This process involves translating the engineer’s design into understandable instructions for the contractors responsible for construction. It’s about turning a structural concept, whether conceived digitally or through calculations, into the tangible framework of a building or infrastructure.
Effective detailing is crucial for ensuring that concrete and reinforcement work together optimally under various loads. This article aims to provide guidelines for achieving successful detailing in both structural elements and connections.
The detailing reinforcement bar depend on whether it has been included for bearing internal tensile forces, controlling flexural or direct tension cracking, supporting compressive forces, confining concrete, limiting long-term deformation, preventing spalling, or providing temporary support during construction.
Key principles govern the detailing process:
- Establish the location and direction of all internal forces to maintain equilibrium.
- Ensure reinforcement is adequately anchored to handle tensile forces.
- Use ductile reinforcement (Class N or better) for strength-related requirements.
- Avoid relying solely on concrete to withstand tension.
- Include sufficient reinforcement for crack control.
- Design steel details practically to facilitate proper installation and concrete placement, especially in complex areas, while maintaining adequate cover.
- Strive for economically viable detailing solutions.
1.0 Detailing of Beams
The general details for beams are covered under AS 3600:2018 Section 8.3 and are summarised below.
1.1 Detailing for flexural reinforcement and tendons
Flexural reinforcement refers to the steel reinforcement bars (rebars) placed at the bottom and top of a concrete beam’s cross-section.
Its primary purpose is to resist tensile forces resulting from bending moments. Concrete is strong in compression but weak in tension. When a beam is subjected to bending, the bottom portion experiences tension while the top undergoes compression. Flexural reinforcement helps counteract these tensile forces.
Flexural reinforcement performs this passively while tendons perform the same task resisting higher forces by being stressed to induce compressive forces in the structure.
1.1.1 Distribution of reinforcement and integrity reinforcement
As per AS 3600:2018 Section 8.3.1.1, tensile reinforcement shall be well distributed in zones of maximum concrete tension, including those portions of flanges of T-beams, L-beams, and I-beams over a support.
For in-situ construction, the following shall constitute minimum requirements for integrity reinforcement passing through a support of a beam other than a perimeter beam:
At a continuous support, at least one Ductility Class N bottom bar of diameter not less than 20 mm, shall be continuous or shall be spliced with a tension lap splice or a mechanical or welded splice satisfying the requirements of Clause 13.2.
At a non-continuous support, at least one Ductility Class N bottom bar of diameter not less than 20 mm, shall be anchored to develop fsy at the face of the support using a standard hook satisfying Clause 13.1.2.7 or headed deformed bar satisfying Clause 13.1.4.
Beams along the perimeter of the structure shall have continuous reinforcement along the entire span and over continuous supports complying with (i) and (ii):
(i) At least one-sixth of the tension reinforcement is required for negative moment at the support, but not less than two bars.
(ii) At least one-quarter of the tension reinforcement is required for positive moment at the midspan, but not less than two bars.
The continuous reinforcement shall be enclosed by closed fitments anchored around a longitudinal bar in each corner. The fitments need not be extended through the continuous supports.
Where splices are required, the top reinforcement shall be spliced at or near the midspan, and the bottom reinforcement shall be spliced at or near the support.
1.1.2 Continuation of negative reinforcement
As per AS 3600:2018 Section 8.3.1.2, negative reinforcement resists hogging moments and is positioned near the top of beams at supports.
Not less than one-third of the total negative moment tensile reinforcement required at a support shall be extended a distance equal to the overall depth of the cross-section (D) beyond the point of contra-flexure.
1.1.3 Anchorage of Longitudinal Reinforcement
As per AS 3600:2018 Section 8.3.1.3, at least one-half of the tensile reinforcement required at midspan shall extend past the face of the support for a length of 12db (12 x bar diameter) plus a cog or an equivalent anchorage; or not less than one-third of the tensile reinforcement required at midspan shall extend past the face of the support for a length of 8db plus D/2.
At a continuous or flexurally restrained support, not less than one-quarter of the total positive moment reinforcement required at midspan shall continue past the near face of the support [1].
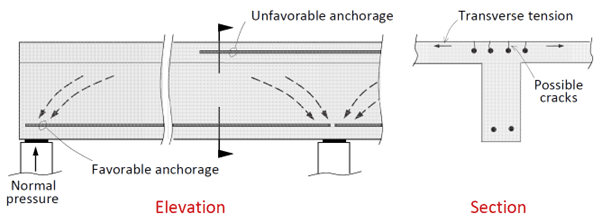
As per the diagram below, when bottom reinforcement is terminated away from the support, the diagonal compression in the web improves the anchorage [1].
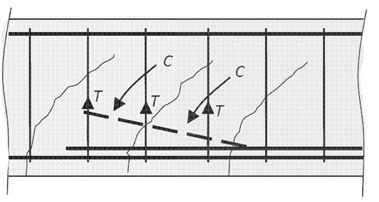
The diagram below demonstrates some elevation views for some different ways to anchor longitudinal reinforcement. The transverse tension that may cause splitting in the plane of a hooked anchorage at a support can be overcome at a beam support simply by tilting the hook and exposing it to the normal reaction pressure [1].

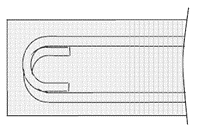
Below is the plan view for the above elevations [1].
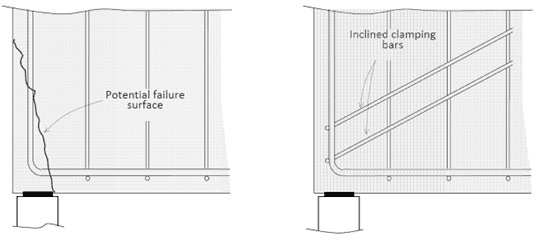
If the bearing length at a support is small and close to the free end of a member, a sliding shear failure along a steep inclined crack may occur. As per the diagram below, additional small-diameter bars may be required perpendicular to the potential failure plane [1].
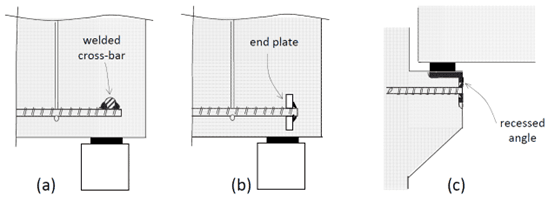
Where the length available for anchorage is small, mechanical anchorages in the form of welded cross‐bars or end plates may be used as per the diagram below. This is common in precast elements, corbels, brackets, and at other support points [1].
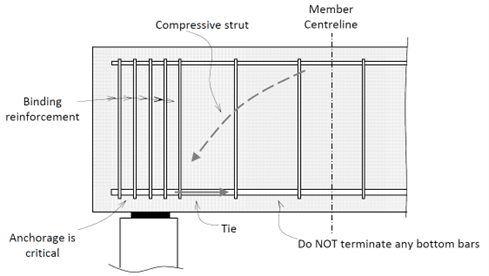
In short-span members, where the load is carried to the support by arch action, it is essential that all bottom reinforcement (the tie of the arch) is fully developed at each support. Closely spaced transverse stirrups can be used to improve the anchorage of the tie reinforcement [1].
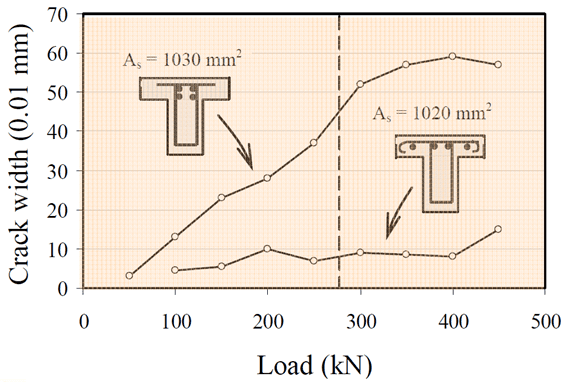
Concentrating top steel at a support in a beam within the web can lead to crack control problems in the adjacent slab, as per the diagram below (Leonhardt et al.) [3] Top reinforcement should be dispersed evenly throughout the flange [1].
1.2 Detailing of shear and torsional reinforcement
As per AS 3600:2018 Section 8.3.2, Shear reinforcement shall comprise of—
a) fitments making an angle v of between of 45° and 90° with the longitudinal bars; or
b) welded wire mesh; or
c) in circular or oval-sectioned members, by helices.
Shear reinforcement shall be spaced longitudinally, not further apart than 0.5D or 300 mm, whichever is less. Where V* ≤ 0.7Vu.min, the spacing may be increased to 0.75D or 500 mm, whichever is less. The maximum transverse spacing across the width of the member shall not exceed the lesser of 600 mm and D.
The shear reinforcement required at the critical cross-section shall be carried to the face of the support. Shear reinforcement, of area not less than that calculated as being necessary at any cross-section shall be provided for a distance (D) from that cross-section in the direction of decreasing shear. The first fitment at each end of a span shall be positioned not more than 50 mm from the face of the adjacent support.
1.2.1 Anchorage of Stirrups
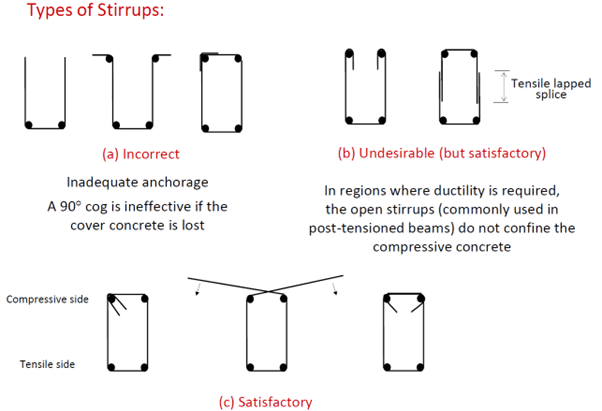
Tension in a stirrup is more or less constant over height of vertical leg. Therefore, all points on vertical leg must be fully developed. Stirrup anchorages should be located in the compressive zone and be shown on the structural drawings [1].
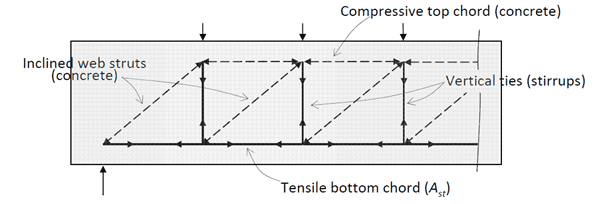
As per AS 3600:2018 Section 8.3.2.4, anchorage of shear reinforcement transverse to the longitudinal flexural reinforcement shall be achieved by a hook or cog complying with AS 3600:2018 Clause 13.1.2.7 or by welding of the fitment to a longitudinal bar or by a welded splice, or by lapped splices.
Where lapped splices are used, the lap length shall be as calculated in Clause 13.1.2, except that for fitments adjacent to the cover concrete, the lap length calculated in Clause 13.1.2 shall be multiplied by 1.3.
Shear reinforcement shall be deemed to be anchored provided the following criteria are met:
a) Bends in bars used as fitments shall enclose a longitudinal bar with a diameter not less than the diameter of the fitment bar. The enclosed bar shall be in contact with the fitment bend.
b) The fitment spacing shall comply with Clause 8.3.2.2. Provided the hook complies with Clause 13.1.2.7, anchorage shall be deemed to be satisfied.
c) Fitment cogs shall not be used when the anchorage of the fitment is solely in the outer layer of reinforcement. In this case, fitment hooks will be used.
Below are some examples of different types of stirrup arrangements [1].
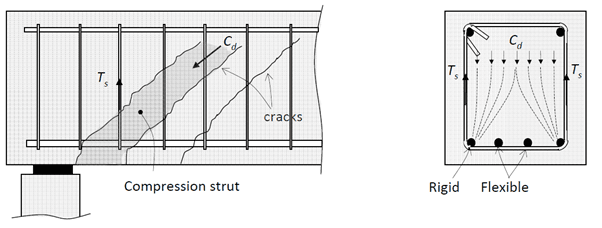
Multi‐leg stirrups should be used in members with wide webs to avoid the undesirable distribution of diagonal compression shown in the diagram below. Multi‐leg stirrups better control shear cracking and help maintain shear transfer through aggregate interlock [1].
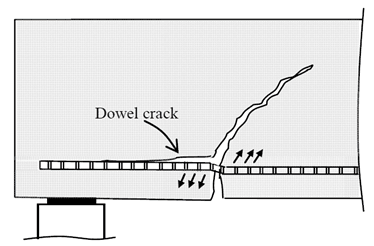
Multi‐leg stirrups are also far better for controlling the longitudinal splitting cracks (known as dowel cracks) that precipitate bond failure of the longitudinal bars in the shear span as per the diagram below. Often, this critical shear crack occurs when the bottom bars are terminated in the shear span.
Additional shear reinforcement may be required in this region (Clause 8.1.10.5 – AS 3600:2009) [1].
1.2.2 Detailing of shear reinforcement examples
Support and Loading Points
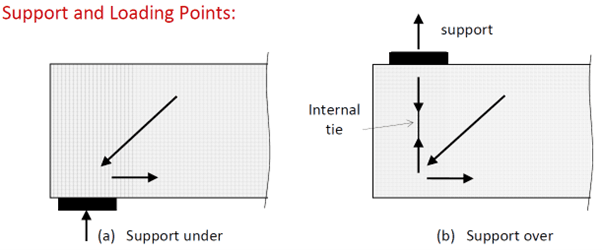
When the support is at the soffit of a beam or slab, the diagonal compression passes directly into the support as shown in the diagram below. When the support is at the top of the beam, the diagonal compression must be carried back up to the support via an internal tie. It is essential that adequately anchored reinforcement be included to act as the tension tie, and the reinforcement must be anchored into the support [1].
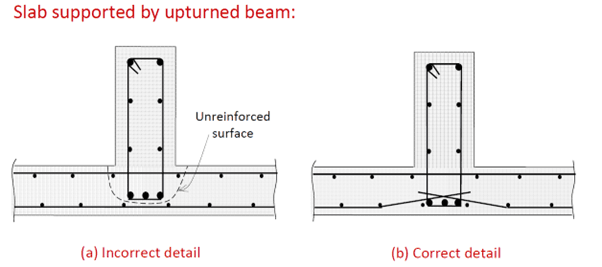
Slab Supported by Upturned Beam
The vertical component of the diagonal compression in the slab (i.e., the reaction from the slab) must be carried in tension up to the top of the upturned beam. Don’t rely on the unreinforced surface in the below diagram to carry this tension [1].
Beam-to-Beam Connection
Below is an example of the shear detailing in a beam-to-beam connection in both section and elevation views [1].
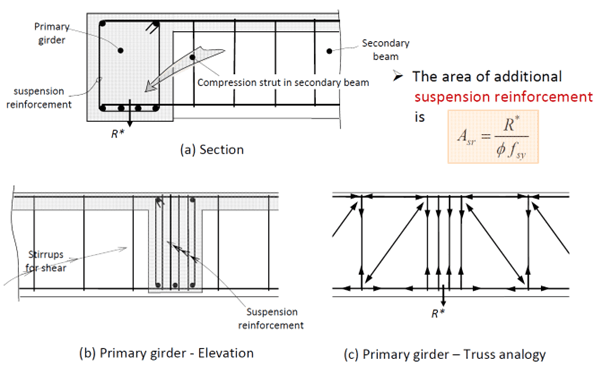
When a load is applied to the underside of a reinforced concrete beam, a device must be used to transfer this hanging load to the top of the beam, as shown in the diagram below [1].

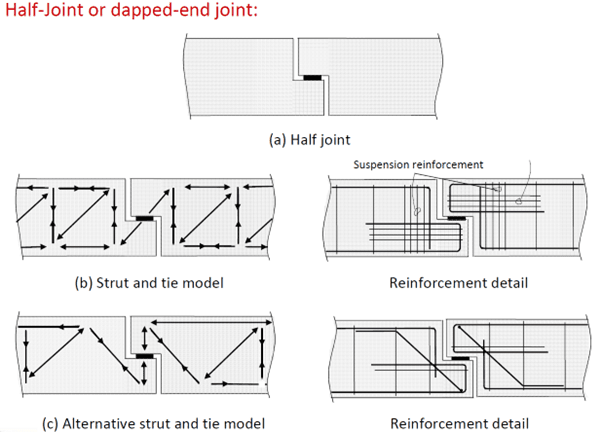
Half (Dapped End) Joint
Half-joints should be detailed according to the outputs of strut and tie modelling, some examples are shown below [1].
1.2.3 End anchorage of mesh
Where mesh is used as shear reinforcement, the ends shall be anchored:
a) in accordance with Clause 8.3.2.4 (detailed above in Section 1.2.1 of this article), if the wires are bent at least to the dimensions of a standard fitment hook; or
b) by embedding two or more transverse wires at least 25 mm within the compressive zone.
1.3 Detailing for Crack Control for Flexural Cracking
Excessive cracking due to restrained deformation or external loads is a common cause of damage in reinforced concrete structures.
Excessive cracking in the hardened concrete can be avoided by including sufficient reinforcement at sufficiently close spacings. Shrinkage causes a gradual widening of existing cracks and time‐dependent cracking in previously uncracked regions.
The minimum quantities of reinforcement specified for crack control in AS 3600 may not be what is actually required in all circumstances.
The width of a crack depends on:
- the quantity, orientation and distribution of the reinforcing steel crossing the crack;
- concrete cover and member size;
- the bond between concrete and reinforcement in the vicinity of the crack;
- the deformation characteristics of concrete; and
- the shrinkage strain (and therefore the time after crack formation)
- the cause of the crack
- the degree of restraint
As per AS 3600:2018 Section 8.6.1, for reinforced concrete beams and slabs, cracking is deemed to be controlled (crack widths will be less than 0.3 mm) if each of the following is satisfied:
a) the quantity of tensile reinforcement in a beam or slab provides an ultimate strength at least 20% higher than the cracking moment calculated assuming σcs = 0;
b) the distance from the side or soffit of the member to the centre of the nearest longitudinal bar shall not exceed 100 mm;
c) The centre‐to‐centre spacing of bars near a tension face of a beam or slab shall not exceed 300 mm for a beam and the lesser of two times the slab thickness and 300 mm for a slab.
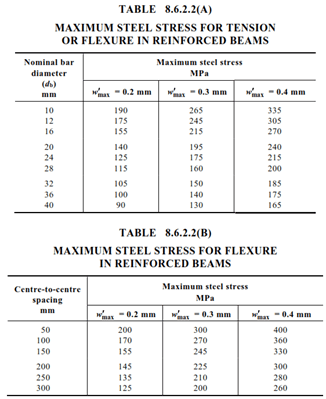
d) The stress in the tensile steel is less than a limiting value (as follows):
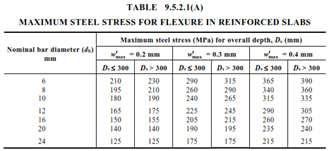
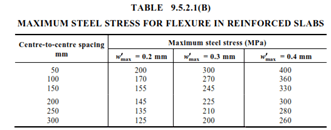
- For members subject primarily to flexure, the calculated steel stress caused by the serviceability design moment shall not exceed the larger of the maximum steel stresses given in Tables 8.6.2.2(A) and 8.6.2.2(B) for beams and Tables 9.5.2.1(A) and 9.5.2.1(B) for slabs.
- For members subject primarily to tension, the calculated steel stress caused by the serviceability design actions shall not exceed the maximum steel stresses given in Tables 8.6.2.2(A) for beams and Tables 9.5.2.1(A) for slabs.
1.3.1 Restrained Shrinkage in Slabs
Slabs, like the one in the below diagram, are restrained by beams and shrinkage induces tension in the slab in the direction of the beams.
Usually, more steel is required to control the restrained shrinkage cracks in slabs than is required to control the flexural cracks and provide adequate strength [1].
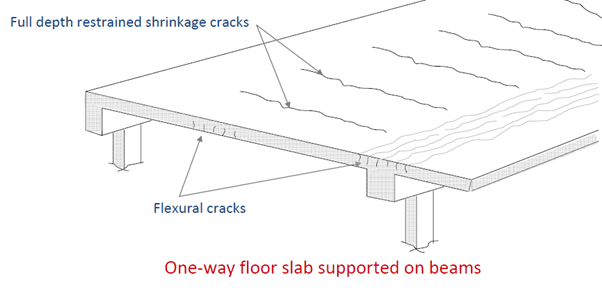
In the primary direction, shrinkage will cause small increases in the widths of the many fine flexural cracks and may cause additional flexure type cracks in the previously uncracked regions.
However, in the secondary direction, which is, in effect, a direct tension situation, shrinkage generally causes a few widely spaced cracks that penetrate completely through the slab. If the amount of reinforcement crossing a direct tension crack is small, yielding of the steel will occur, and a wide, unserviceable crack will result.
To avoid this eventuality, the minimum steel ratio, $ρ_{min}$ is determined by AS 3600:2018 Section 9.1.1.
$$ρ_{min} = \left( \frac{A_{st}}{bd} \right){min} \gt C\left( \frac{D}{d} \right)^2 \left( \frac{f^`{ct.f}}{f_{sy}} \right)$$
Where $C$ is 0.24 for slabs supported by columns at their corners or 0.19 for slabs supported by beams or walls on four sides. Refer to AS 3600:2018 for details on how each term is calculated.
For cracks in the primary direction, no additional reinforcement is required other than as per the equation above.
However, for a serviceable crack width in the secondary direction, significantly more steel than this is required. As per AS 3600:2018 Section 9.5.3.4(a), where a slab is restrained from expanding or contracting in the secondary direction, for a slab fully enclosed within a building except for a brief period of weather exposure during construction, the area of reinforcement in that direction shall be not less than the following:
$$A_{st} \gt (C-2.5σ_{cp})bD*10^{-3}$$
Where $C$ is 1.75, 3.5 or 6.0 depending on whether a minor, moderate or strong degree of control over cracking is required, respectively.
Refer to AS 3600:2018 Section 9.5.3.4 for the reinforcement required in other exposure classifications.
2.0 Detailing of Columns
2.1 Lapped Compressive Splices (Longitudinal Reinforcement) in Columns
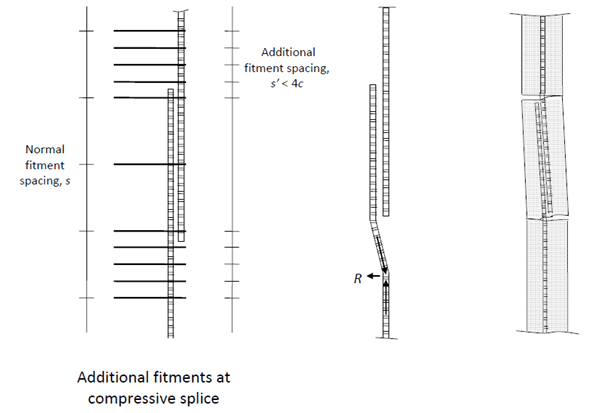
Compressive splices in columns should be lapped according to the below diagram, where s is the normal fitment spacing and c is the concrete cover [1].
2.2 Tie/Fitment Arrangements (Transverse Reinforcement) in Columns
AS 3600:2018 stipulates the requirements for restraining single longitudinal bars in columns include:
a) Every corner bar;
b) All bars ‐ where bars are spaced at centres > 150 mm;
c) At least every alternate bar ‐ where bar centres ≤ 150mm.
For bundled bars – each bundle must be restrained.
Below are some typical tie arrangements in columns, depending on the number of vertical bars [1].
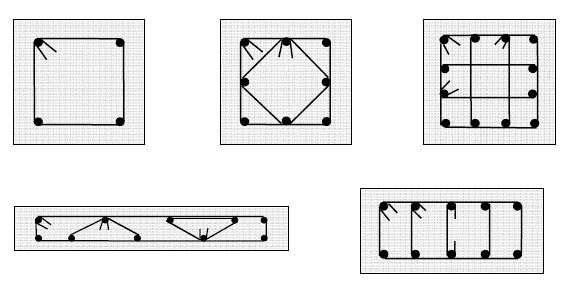
All longitudinal bars in these columns are restrained at:
a) a bend in a fitment of 135° or less; or
b) at a fitment hooks with included angle of 135° or less, as shown.
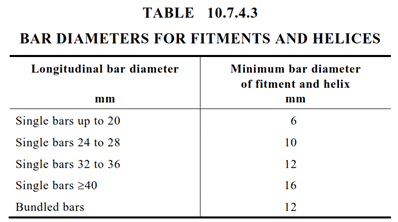
As per AS 3600:2018 Table 10.7.4.3, the minimum bar diameters for fitments depend on the longitudinal bar diameters.
As per AS 3600:2018 Section 10.7.4.3(b) the spacing of fitments, or the pitch of a helix, shall not exceed the smaller of—
a) b and 15db for single bars; or
b) 0.5b and 7.5db for bundled bars;
where
b = smaller column cross-sectional dimension if rectangular or the column diameter if circular
db = diameter of the smallest bar in the column
3.0 Beam-Column Connections
3.1 Knee (Two-Member) Connections
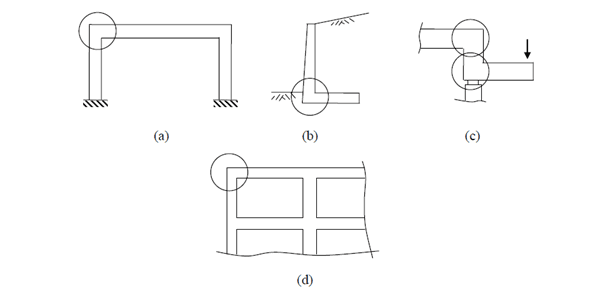
The detailing of beam-column connections for two-member or knee connections depending on the direction of moment applied to the connection. Below are some examples of two-member connections [1].
3.1.1 Knee (Two Member) Connections Under Opening Moment
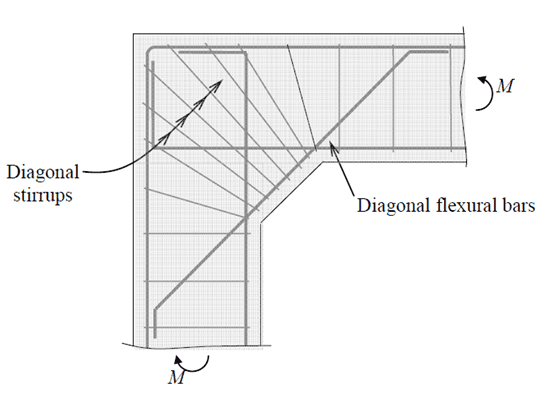
Under an opening moment, a knee connection is subject to the below forces. The below diagrams suggest some reinforcement arrangements and demonstrate which ones are appropriate [1].
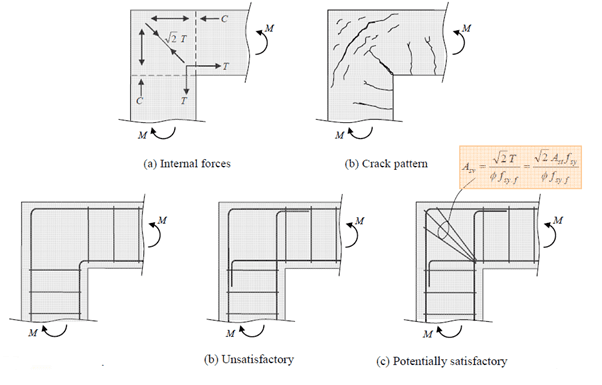
The suggested detail for a knee connection under an opening moment is below [1].
3.1.2 Knee Connections Under Closing Moment
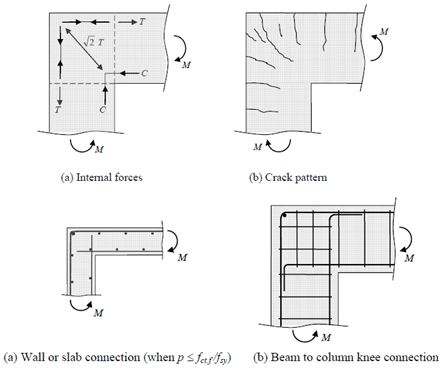
Under a closing moment, a knee connection is subject to the below forces. The diagrams below suggest the recommended reinforcement arrangement for this connection [1].
3.2 Three Member Connections
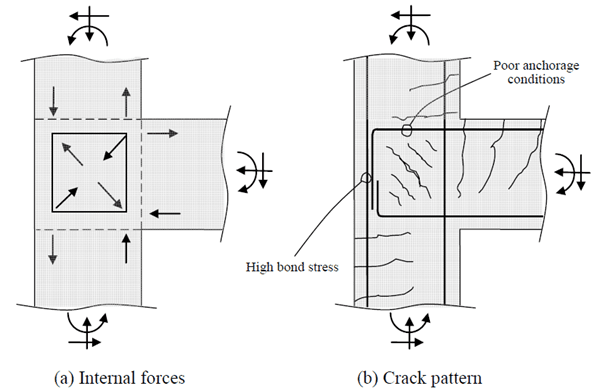
A three member connection is subjected to forces as per the below diagram [1].
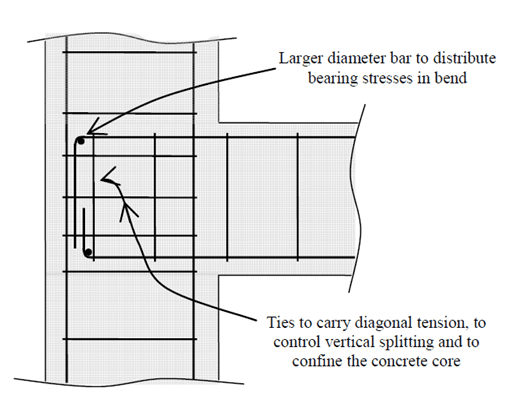
It is important to ensure the reinforcement is adequately anchored. Below is the recommended reinforcement detail to address these issues [1].
3.3 Four Member Connections
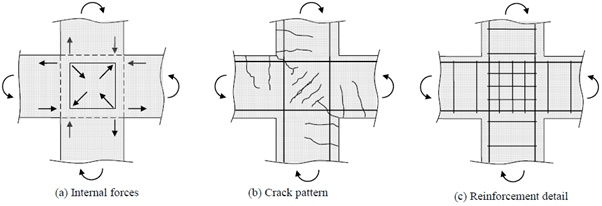
Below are the internal forces, typical crack pattern and recommended reinforcement detail for a four member beam-column connection. Note, the additional stirrups in the centre of the connection spaced closer than the typical spacings [1].
4.0 Detailing of Corbels
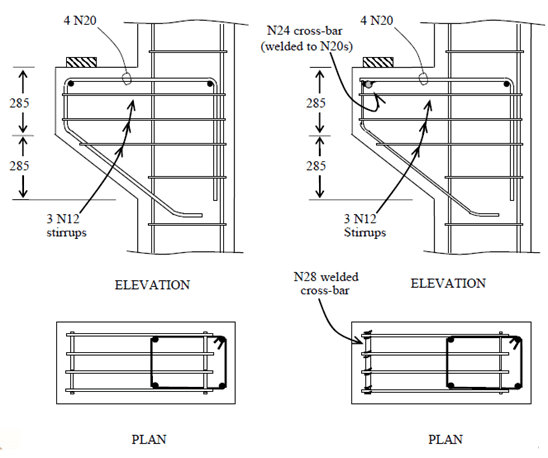
Corbels are detailed by considering their internal forces. Recommended reinforcement details are shown below [1].
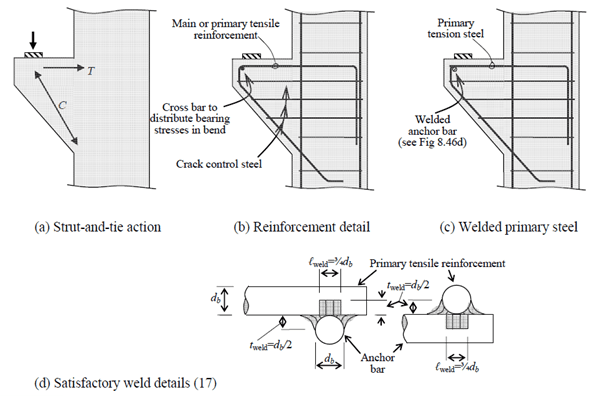
The design procedure for the reinforcement detailing of corbels revolves around considering the forces acting along the strut © and the tie (T) in the below diagram [1].
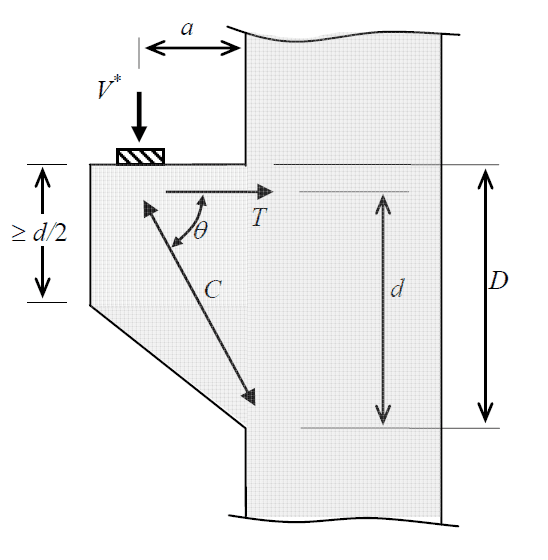
Park and Paulay (1975) suggest that a good first estimate of corbel dimensions [2] is obtained from:
$$\frac{a}{d} \le 1.0 \text{ and } \frac{0.04f^c}{f_{sy}} \le \frac{A_s}{b_wd} \le \frac{0.2f^c}{f{sy}}$$
The American Institute (ACI) Building Code Requirements for Structural Concrete ACI 318-08 suggests:
$$\frac{a}{d} \le 1.0 \text{ and } \frac{0.04f^c}{f_{sy}} \le \frac{A_s}{b_wd} \le \frac{0.2f^c}{f{sy}}$$
We can find the area or steel required in the tie by re-arranging the below equation.
$$T=\frac{V^*}{tan(θ)}=∅A_sf_{sy}$$
$$A_s=\frac{V^*}{∅f_{sy}tan(θ)}$$
We can find the area or steel required in the strut by re-arranging the below equation.
$$∅_{st}C_u=∅_{st}β_s0.9f^`_cA_c$$
Where, $A_c$ is the smallest cross-sectional area of the concrete strut at any point along its length and measured normal to the line of action of the strut determined in accordance with AS 3600:2018 Clause 7.2.3. The strut efficiency factor is shown below.
$$β_s=\frac{1}{1+0.66cot^2θ} \text{ where } 0.3 \le β_s \le 1.0$$
$$A_h>A_s/2$$
4.1 Design of Corbel Example
Let us consider the below example of a corbel that has a bearing plate of 200 x 300mm in plan view. The characteristic compressive strength of the concrete is 32MPa, with a cover of 30mm and the steel has a yield strength of 500 MPa [1].
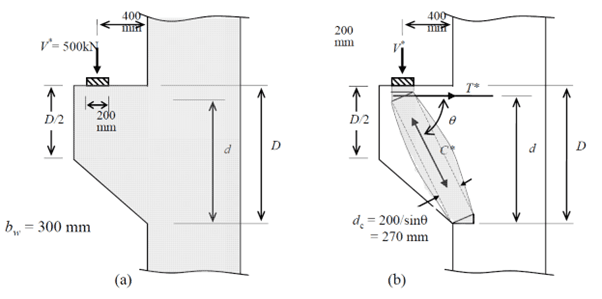
Park and Paulay (1975) suggest that a good first estimate of corbel dimensions is obtained from [2]:
$$\frac{V^*}{b_wd} \le 0.56 \sqrt{f^`_c}$$
$$d \ge \frac{V^*}{b_w0.56 \sqrt{f^`_c}}=\frac{500*10^3}{300*0.56*\sqrt{32}}=526mm$$
With $D$ = $d$ + cover + 0.5 bar dia and assuming 20 mm diameter bars, take $D$ = 570 mm and therefore $d$ = 530 mm.
From the geometry:
$$tan(θ)=\frac{d-100tan(90-θ)}{400}∴θ=47.7°$$
Therefore:
$$A_s=\frac{500*10^3}{0.8*500*tan(47.7)}=1138mm^2$$
Let’s use 4 No. N20 bars and check the adequacy. $A_s=1240 mm^2$.
We can check this against ACI 318-08:
$$\frac{0.04f^`_c}{f_{sy}} \le \frac{A_s}{b_wd}=\frac{1240}{300*530}=0.0078=\frac{0.122f^`_c}{f_{sy}} \le \frac{0.2f^`_c}{f_{sy}}∴Satifactory$$
The strut efficiency factor can be calculated next.
$$β_s=\frac{1}{1+0.66cot^2(47.7)}=0.65$$
Next, we will check if the strut is adequate.
The depth of the strut cross section can be determined as per the below.
$$d_c=\frac{\text{bearing plate length}}{sin(θ)} =\frac{200}{sin(47.7)}=270mm$$
$$A_c=b_w d_c=300*270=81120 mm$$
$$∅_{st}C_u=∅_{st}β_s 0.9f^`_cA_c=0.6*0.65*0.9*32*81120=911 kN$$
$$C^*=\frac{V^*}{cos(θ)}=\frac{500}{cos(47.7)}=743kN\lt ∅_{st}C_u ∴ \text{Therefore the design is adequate [1].}$$
5.0 Joints in Structures
Concrete structures incorporate joints for primarily two purposes:
- They serve as intervals in the concrete pouring process, allowing for controlled pauses in construction. The positioning of these construction joints varies based on the scale of the construction site and the workforce’s productivity.
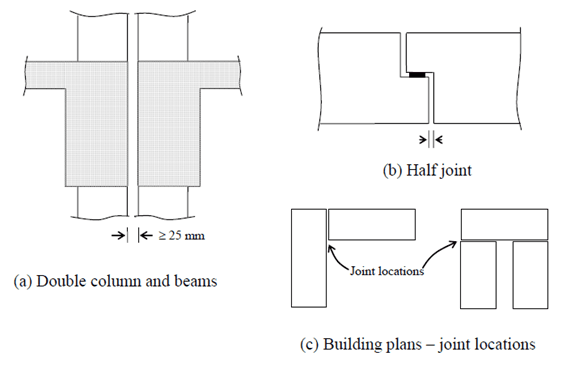
- Joints also accommodate structural movements, such as expansion, contraction, rotation, or settlement, without causing localized damage or compromising the structure’s integrity. These include various types such as control joints (contraction joints), expansion joints, structural joints (like hinges, pin, and roller joints), shrinkage strips, and isolation joints. The placement of these joints is determined by the expected movement of the structure.
5.1 Construction Joints
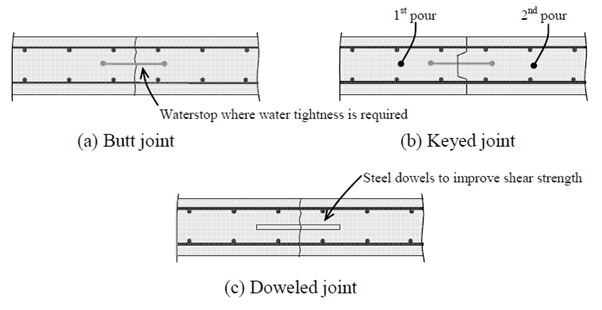
These joints are intentional gaps left between different concrete placements or pours. They help manage the construction process by allowing controlled stopping points for work, facilitating the continuity of the structure without affecting its integrity.
They’re typically placed at the end of a workday or at planned stopping points during construction [1].
5.2 Control (Contraction) Joints
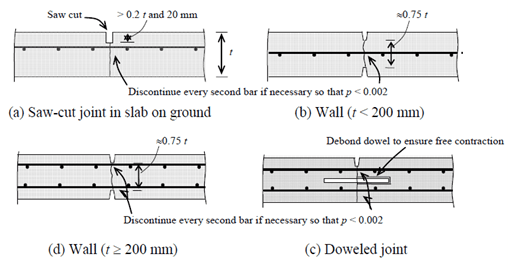
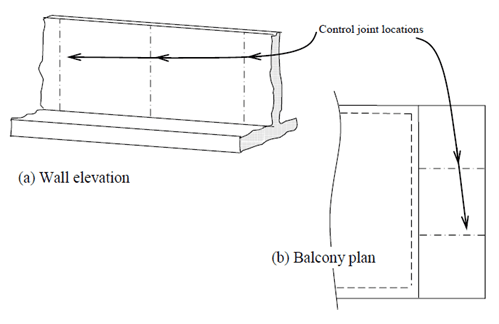
These are deliberate separations in concrete or masonry intended to control cracking due to shrinkage as the material dries and settles.
They help manage the forces caused by contraction, preventing unsightly or damaging cracks in the structure. Control joints are strategically placed to guide where cracks might occur, typically in large expanses of concrete, like floors or slabs [1].
5.3 Expansion Joints
These joints are designed to absorb expansion and contraction caused by temperature fluctuations, seismic activity, or structural movement.
They’re used to prevent damage due to these forces by allowing parts of a structure to expand or contract independently without causing stress or damage to the whole.
Expansion joints are common in bridges, buildings, and other structures where movement due to temperature changes or seismic activity is expected [1].
5.4 Hinge Joints
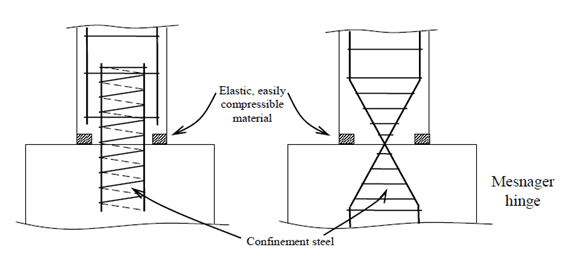
In the context of building construction, hinge joints typically refer to joints that allow movement in one direction while restricting movement in other directions.
They’re used in structural systems to allow controlled movement, particularly in seismic zones or areas where buildings need to sway or move with certain forces to maintain structural integrity.
These are commonly found in earthquake-resistant buildings or structures where controlled movement is crucial for safety [1].
Conclusion
To conclude, it is not enough for an engineer to be able to design reinforced concrete beams, slabs, columns, footings, and corbels without understanding how to join all these elements together appropriately to pass load throughout the load path during construction and under the ultimate design conditions.
This article describes some of the key principles in reinforcement detailing but is not an exhaustive list of the stipulations required by AS 3600. Engineers should refer to the below sections of AS 3600:2018 for further details on the relevant detailing requirements:
- Section 7 Strut & Tie Modelling
- Section 8.3 General Details for Beams
- Section 9.1 General Details for Slabs, Section 9.3 Detailing of Shear Reinforcement in Slabs, and Section 9.5 Crack Control of Slabs
- Section 10.7 Detailing of Columns
- Section 14.4 & 14.5 Detailing Requirements for Earthquake Actions
References
[1] Lu, D. (2014). ‘Detailing of Reinforcement’’ [PowerPoint presentation]. UNSW. (Accessed: 2 Feb June 2024).
[2] Park, R & Paulay, T (1975). ‘Reinforced Concrete Structures’ Print ISBN:9780471659174 |Online ISBN:9780470172834 |DOI:10.1002/9780470172834 Copyright © 1975 John Wiley & Sons, Inc.
[3] Leonhardt et al. (1984). ‘Prestressed Concrete’ Published by MIT Press (MA) April 1984, 1984 ISBN 10: 0262121050ISBN 13: 9780262121057
Seismic Retrofit Series: URM Insights for US and Canada Engineers
August 5th at 1 pm Eastern Time (ET)
Save your spot →Reviewed by:


.svg)



.png)
